
|

|
Title: Stealth and Style Rings
Size: 19 in x 29 in
Medium: Digital
Date of Completion: December 2023
Two digital posters were created to showcase a product of my own for an industrial design project. We were given creative liberty to make a product that connects to our theme, and I made a self defense product inspired by a company called Invisawear. My intentions with this product were to create a discreet and fashionable product that was also functional.
Inspiration

|

|
Invisawear necklace and bracelet by Rajia Abdelaziz
My inspiration is engineer and businesswoman Rajia Abdelaziz. Rajia Abdelaziz is from New Hampshire and attended University of Massachusetts Lowell college. She designed the invisawear necklace when she noticed that less women would go to class as the sun set earlier, because as she said many women felt unsafe going to class when it was darker for longer. She wanted to help women feel safe with a disguised safety device that contacted the authorities quickly, and she wanted to be disguised so that no potential attacker would suspect that it is a safety device. Rajia Abdelaziz had trouble starting her business at first, because of her inexperience with business and technological concerns from investors. One of the concerns was the advancement of technology. Since Bluetooth LE was the main power source, which was new technology when Abdelaziz was looking for investors and it was difficult to work with. Ray Hamilton, classmate of hers, helped her start the foundation of the Invisawear in 2016, and in 2017 they signed up for the Winter Business Accelerator that would help them set their plan into action. Rajia Abdelaziz's mentors helped a lot with linking her and Ray Hamilton to investors, lawyers, and manufacturers to expand their busniess. Raijia and Hamilton raised a total of five hundred thousand dollars from investing and it helped the two increase productivity. The necklace's function is to contact family and police by double tapping it whenever someone is in trouble. It is now powered by RapidSOS, and her company has expanded from necklaces to key chains and bracelets.
My first reaction to this was amazement. I think it is such a unique and useful product that makes a great positive impact on the lives of people without inconvenience. I love how a safety device can be lightweight, stylish, and discreet. I also like the simplicity of the look. A lot of safety or self defense devices take up a lot of room and cannot always be accessed easily, but this helps people and looks well.
My first reaction to this was amazement. I think it is such a unique and useful product that makes a great positive impact on the lives of people without inconvenience. I love how a safety device can be lightweight, stylish, and discreet. I also like the simplicity of the look. A lot of safety or self defense devices take up a lot of room and cannot always be accessed easily, but this helps people and looks well.
Planning
My inspiration came from a very unique product, but I saw a way to take certain aspects from it and make a product of my own. Since my theme is coming of age, I had a hard time thinking about how an object could help people that are growing up deal with everyday life. Because I fit into my theme I thought about my own life, and wondered when it would be helpful to have a certain product. I began to think about walking home. My fear of walking home got worse after I had learned that Milwaukee is one of the most dangerous cities in the United States. I only walk home for a short period of time after taking the bus, but it would be nice to have a convenient product to help me feel safer. This would connect to my theme of coming of age because as we grow older, especially during our adolescent years, we have to learn to rely on ourselves and solve our own problems without a parent's help. This is a very real and daunting thought, but it is something everyone has to face eventually.

I made my first idea very similar to invisawear, because I wanted the product to be an accessory that was stylish and convenient. A ring seemed like an adequate size to work with technology, and easy to carry around. My first idea was called ring of fire because it would serve as an emergency light that would help anyone who was in trouble or lost. Because my intention was to build it for some who walked home at night, a bright light would be an attention-grabber or a nice way to see at night. I had planned to be able to change the intensity of the light depending on the situation (flashing to grab attention, low or bright light if lost).

I began to think of the things I carried when I walked home, and my first thing that I thought of was my cell phone. I thought this because it is what I always have in my hand to call someone in case of an emergency. So my second idea was to weaponize my phone somehow. The easiest solution would be to alter the phone case, instead of the actual phone. I have my phone in my pocket while walking, and I thought that if someone were to try to attack me, I would want to use my phone to hit back, but effectively. So I drew a phone case that had sharp edges at the top that looked like animal ears, so that it would be a discreet disguise.

These ideas were okay, but I compared the two of them and evaluated their features. They were both convenient ways to feel safer, but the phone seemed too similar to another self defense key chain I've seen, and it would have taken up too much weight and space. The ring seemed like the better option, but there are only so many limits that light can do in terms of safety and defense, especially against a violent person. It could shock someone and help see in the dark, but a phone already has a flashlight that can do the same thing, and this would have just been a smaller, slightly faster way to do that. Then I thought of ways that I could connect these two ideas to my inspiration to create a better reliable product. I really liked the idea of using rings as lightweight self defense, and sharp edges to defend against an attacker, so I combined the two ideas.
Process

|

|
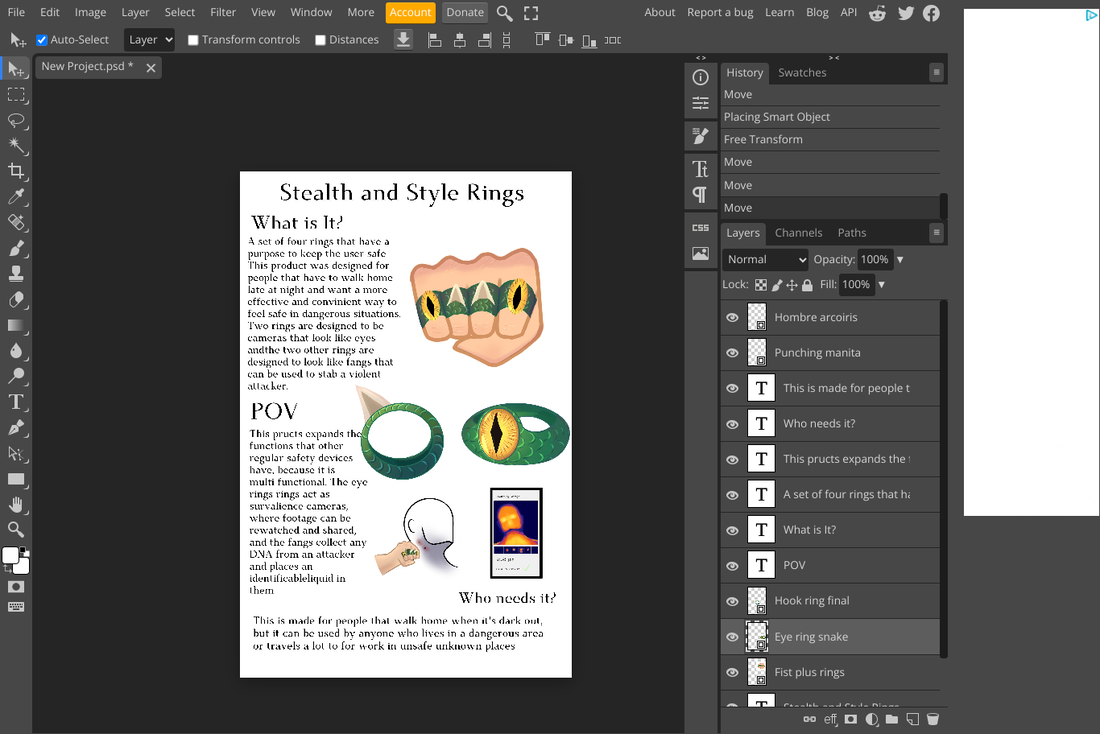
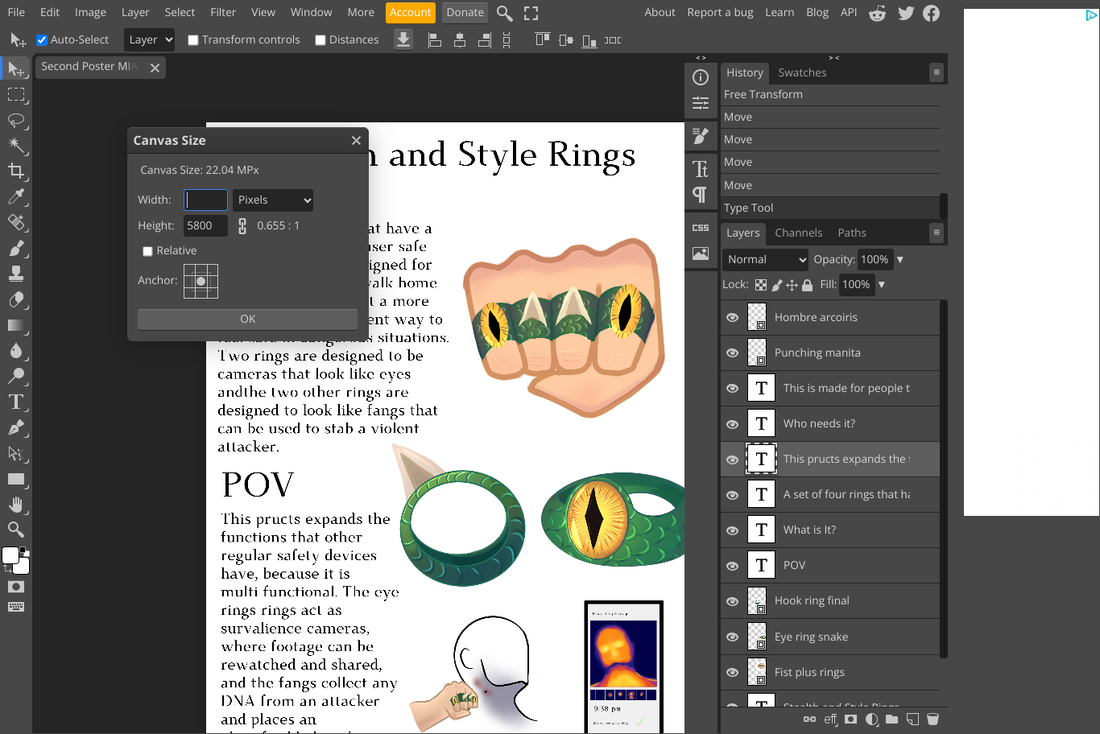
I settled on rings that would serve as a disguised form of a self defense weapon. Instead of having only one ring, I increased the number to four, because that way the rings had more potential to do more tasks instead of just a single one. To add to the perk of subtlety, making them stylish was a necessity. An animal that inspired the design was a rattlesnake because they only attack if they feel threatened, and can be very aggressive if they feel unsafe, plus, this made the design look more ordinary. To combine the features of blades and safety accessories from my inspiration, I assigned two of each ring a specific task. The 'fangs' of the middle and ring finger are blunt edges of steel, to use against an attacker in a quick reaction if they have violent intentions. Punching someone is an instinctive reaction to me, and the blunt blades would provide support making sure that the victim has an advantage in causing damage. The second types of rings are in the pinky and pointer finger are hidden thermal cameras. At first I wanted to make regular cameras because that would have been fine, but then I remembered that a lot of cameras don't pick up footage well in the dark, and this was designed to be used for people that walk home late at night. Using the snake design to my advantage, I remembered that snakes see heat, and I made the snake eye cameras be thermal cameras to fit the theme and to be more useful at night. The image on the right shows an illustration I made of the difference between a regular camera view of a person (bottom) and the thermal camera at night (top). These cameras would help the authorities in finding the attacker if they ever got away, because now there would be up close footage of them. The utility of these rings combined strengthens the product design.
Experimentation
We spent a couple class periods pitching our ideas to the class to get feedback from our peers on how we could improve the product and expand on the idea. While they asked you questions about your product you had to ask yourself questions about it too.

|

|

|
The photo on the left shows the first board drawing that was my original idea drawn onto a white board. We were instructed to sketch our idea and write descriptions of what our product is and what it does. Then, we were told to get into a group of people and give feedback while they presented their project. When it was my turn to present, I realized that I had a very short presentation because I thought my product's purpose was very straightforward. To fix this, my partners gave me some ideas as to how I could expand the usage of my product. They said that the ring that has fangs should have a hook underneath to get a DNA sample of the attacker as you hit them, and then the police can use the DNA sample to track down whoever tried to attack. I thought this was a good idea, because my main concern with this project was relying on yourself and safety, and with this addition even after a dangerous encounter there could still be a sense of safety knowing that the attacker won't get away consequence-free. I drew their feedback in purple marker to show which ideas were my original and which were my partners'. (middle image). After a couple of classes, we had to present our product to the entire class and further discuss how we could improve it. This process was experimental for everyone because we had to answer questions that we didn't have answers to about our ideas, and we all had to participate by adding suggestions. The image furthest to the right shows some of the suggestions I wrote down from my classmates in blue. We didn't have to apply all of our suggestions to our final product, but they helped expand the potential a simple idea could have. Some of the suggestions included adding a GPS (similar to Invisawear) an identification feature for the attacker, and being able to re-watch footage from the cameras from an app.

|

|

|
These were some sketches that industrial designer Murf drew when we had to present our idea to the class. They helped me see how I could present my final product in a clear and dynamic way.
Process Continued
I wanted to create my poster drawings digitally because I felt that transferring a digital image to a digitally created poster (Photopea) would be easier than from paper to digital. The only digital drawing platform that I had used before and felt comfortable with is an app called Ibis Paint X. It has a lot of mechanics that make it easy to draw, and I have had experience with it before so I was excited to draw my product here and give a good image of what it would look like.

|

|
I started out by drawing one of the rings with the thermal camera. I used the pencil tool to loosely sketch out an idea of how I wanted to show the ring from a certain perspective, and then used a stabilizer tool (made drawing less messy as I drew) and an oval ruler on a different layer to trace over the sketch to make a final outline of what I wanted. My outline was in color black, but I felt that was too contrasting of a color for the visual that I was going for, so I clicked on a filter tool that let me change the color of the outline by picking it out on the color wheel. I chose a turquoise color because it was less contrasting. I then colored the ring with a bucket tool that colors a selected section one solid color. I colored it a lighter turquoise color for the outside and a bright yellow for the inside of the eye. To make it look more dynamic, I selected each section with the magic wand tool (only lets you draw in the selected spot) and colored the sections with variations of green and orange. The brush tool had a lot of options of what kind of brushes to use for different results, I used a brush called airbrush to get a softer blend between the solid colors and the shading I was adding.

|

|
Next I worked on the eye part of the ring. I tried to draw a perfect diamond shape using the brush tool, but it was not looking the way I wanted it to. I found out about a feature that can be added to the brush that allows it to form into a shape. There was no diamond shape option but there was a square option. I changed the brush to a hard brush instead of airbrush to get a clean look, and made a square with the shape feature. To manipulate the shape into a diamond I selected the layer on which I had created the shape and made it move. I could enlarge it, give it perspective, or manipulate the shape itself with a feature called mesh form. This part was similar to puppet warp in Photopea, but less complicated and easier to manipulate. To add more dimension to the eye, I added lines to the iris. The top right of the screen has many types of ruler options to choose from, and I chose to use the radial ruler at the center of the pupil. To add detail, I shrunk the size of the brush and changed the colors to brown and orange. The radial ruler prohibited the lines I was drawing to get messy, and because I had used the magic wand on the iris of the eye, my lines could not go further than the iris, making this process quick and easy.

|

|
The last part was to add the scales to the ring. I again used the oval ruler but this time to draw patterns of scales. In the first image to the left, I drew only those 3 scales and erased the overlapping lines in the back with the eraser tool. To make the process easier, I copied the layer with the first 3 scales and kept pasting it over and over again, until it completely covered the outside of the ring. Because I forgot to select the outside of the ring with the magic wand, that meant that any lines outside of the area I was drawing on could be seen in the white background, and so I had to erase those lines with the eraser. My last step was to add any highlights and shadows. I started with the highlights because it helps me see where the shadows should be. To add highlights, I added another layer on top of my other ones and changed the layer. The bottom left of the screen has a section where you can alter the look of what is drawn on the layer. The default is normal, but I changed it to 'add' because that makes any color on the layer intensely brighter. As you can see on the image to the right, the little dark green square at the bottom of the image is the original color that I was using, but because I changed the layer to 'add' the actual color looks like light green when I draw. I used this same method to highlight the iris. Using the oval ruler again, I individually drew each highlight of each scale, changing the width and length of the ruler to best match the scale I drew.

|

|

|
After I drew the first ring, I moved on to the second type of ring, the fang. The process was almost the same as the first ring. I sketched out the ring in red because it was only a loose sketch. I drew the bottom of the ring so that the viewer could see the hook. Then I stabilized my brush to make the final outline neat, and used the oval ruler to trace over the outline. Like the first time, I made the ring a solid turquoise and shaded it with a different green using an airbrush. To make the hook, I made the brush utilize the shape feature from earlier, but with a triangle instead. I used the mesh form to make the triangle shape curve at an angle instead of being blocky to make it look like a hook. I then used a straight ruler to make the inside of the hook (as shown in the middle image) instead of making another triangle, so I curved the angle of the ruler to make it tilt to the left and drew two straight lines that met. I filled in the second triangle with the bucket tool to get a solid color. Then the bottom scales were made using the oval ruler, but I did not copy and paste them this time because they were just a single curve on the ring and not a complicated pattern. I created the highlights the same way, changing the layer from normal the 'add' to create a bright color and using the oval ruler to highlight as accurately as possible.

|

|
I needed to draw an image showing how my product should be used, and it was a pretty straightforward idea. It's meant to be used in defense against a violent person, so I sketched the image in my head that I thought of when someone needs to defend themselves in a fight. I made the sketch more transparent by changing the opacity of the layer, and I began to draw my outline. Again, to make a clean outline I turned on the stabilizer and drew on a layer above. I wanted to color in the silhouette of the person being punched, but decided that it would be too distracting from the product and the punching hand. Instead of using a filter to change the outline color, I drew the final outline with the color that I was going to keep. I colored in the hand's skin color with a brush instead of using the bucket, because if I used the bucket the color would "spill" onto the rest of the canvas, because I need to close the color in with a clear line, but I didn't want to make a clear line between the hand and the air. The rest of the coloring process was the same as the previous images, but the rings were so small in this piece that detail was not a priority. I also did not change any layer to 'add', and instead picked a brighter color on the color wheel itself because the detail wasn't the focus, the use of the product was.

|

|

|
Focusing less on the rings, I made my next drawing about the look of the app, showing how one can re-watch and send footage recorded by the cameras. At first I wanted to use the straight ruler a bit more, and used it to make a drawing of a phone, but it looked too disorganized, so I used the shape tool once more. I made a black rectangle for the phone on one layer, a smaller grey rectangle in another layer, and one final dark blue rectangle in the top layer. The blue rectangle would be the background for the footage the camera caught, because it is thermal. I sketched the silhouette of a person looking down at the camera as if the victim was about to strike, and we can see the face of the attacker. I used a lighter blue as a base color for the person and added more color later on. I used the magic wand to select the dark blue square so that my colors wouldn't spill out. After I colored the base of the person blue, I added more layers to add colors that resembled a thermal view. The brush that I used for this part is called graphite, and it has a fade to it. I was not worried about adding detail to this part because it is just a demonstration of what the app would look like in use, and this brush has a more authentic feel to a thermal view. I changed the drawing colors from red to orange and yellow in each layer, making the brightest colors be on the top. I also lowered the opacity of some layers to not make the colors be too overwhelming. I changed the layer to 'add' for the brightest features, like the eyes, nose, and chest, so that the viewer can tell that the drawing is supposed to be a person. I also used a text tool. I just clicked on the screen where I wanted to place text and I typed out words such as "re-watching footage" and the time, which someone would be able to see on their phone.

|

|

|
The last illustration I created was the whole set of rings together on a hand, ready to use. I felt the front view would be the most effective view to show how these rings are supposed to be used. Using my hand as a reference, I sketched out a fist with a thicker outline than the rest of my drawings, because this one had to be very clean. I used a brown-peach color for my final outline, and I turned the intensity of the stabilizer to a 7, to make sure the final product did not look rough (highest stabilizer setting is 10). I traced over the sketch carefully, and made the sketch more transparent so I could focus on my final drawing more. I did have to back and erase some mistakes where the pencil spiked in some areas, because that's what stabilizer does to a pencil. Then I created some arcs in the middle of the fingers with the oval ruler. These arcs were the rings. I closed the outline of the arcs with pencil and filled them in with the bucket tool. Then I selected the rings with the magic tool and shaded them with airbrush. I drew scales without a ruler since most of them were going to get covered up anyway by the eye and fangs. I made two ovals using the shape tool and colored them yellow with the bucket tool. For the pupils, I drew them with the pencil without any modifications. I still used the radial ruler to draw the lines of orange and brown in the irises, and used 'add' in layers to do any lighting. I drew the fangs without using the shape tool because it was easier to make the perspective I wanted by drawing it than with the shape tool. I added any shadows by drawing a magenta colored shadow and turning the opacity down.

|

|
After I drew all of my pictures I saved them to my Chromebook and began to work on creating the posters. I had to use Photopea to create them. I started by adding text to the first poster. This was done by clicking and dragging the text tool box from the lower left of the screen. I could change the font and make the size bigger by changing the settings on the top bar of the screen. I used pictures from Google for my existing solutions. I chose an image, right clicked it and chose "save as..." to place it in my poster.

To add the images that I had created, I had to share the images I drew from my personal computer to Canva with my school account. From there I downloaded the picture and inserted them by clicking file, open and place, and placed my images. I clicked and dragged the images to move them around, and used free transform to shrink or enlarge them.
|

|
I did the same process for my second poster. The text tool is a little confusing to use at first because the text itself defaults to white, but it can be changed by choosing a different color on the tab above. I changed the font of the second poster because this is my main poster and I wanted it to look neater. I was having trouble making the font larger at first because the maximum font size is 150 when you drag the size bar, but if a number is typed into the box then it surpasses that maximum.
|
|
I wrote the titles and descriptions after I added the pictures. This process was very simple, because the images I added were just PNGs, and typing out the words on my poster was quick. Before I could export both of my posters, I had to go to the Image tab at the top and change the canvas size, because during the process of creating the poster the size would inexplicably shrink, and I would have to go back and change it to 19 inches by 29 inches again before saving it as a PDF.
Critique

|

|
Invisawear and my rings have a couple of similar characteristics. They are both safety devices disguised as ordinary accessories. They were made to look like regular pieces of jewelry so that they would not be an obvious safety device that one would find a bother to carry around. They are small and lightweight to minimize inconvenience. Whenever the owner of either Invisawear or my ring set needs to contact the police, they have a gadget that can share their location immediately when they are in trouble.
The basis of Invisawear and my ring set is the same, but there are some key differences that set the two apart. To begin, Invisawear only sends the wearer's location to police, friends and family, but cannot be used to help in any other way. This means that the Invisawear jewelry is a hidden emergency caller that is always within reach, while my product has more functions. My product is primarily focused on self defense and fighting back against someone else, rather than just calling for help. The Invisawear necklace cannot be used directly as a way to physically defend oneself, whereas my product is designed to strike the attacker to get them away, record them, and eventually arrest them. Invisawear does not have cameras or a way to make sure an attacker is caught, because its focus is sharing the victim's location immediately when there is danger. My product has an app where the person can already share their location at a certain hour when they walk home, instead of when there is already danger. The police and the user can both see the footage recorded on the rings.
The basis of Invisawear and my ring set is the same, but there are some key differences that set the two apart. To begin, Invisawear only sends the wearer's location to police, friends and family, but cannot be used to help in any other way. This means that the Invisawear jewelry is a hidden emergency caller that is always within reach, while my product has more functions. My product is primarily focused on self defense and fighting back against someone else, rather than just calling for help. The Invisawear necklace cannot be used directly as a way to physically defend oneself, whereas my product is designed to strike the attacker to get them away, record them, and eventually arrest them. Invisawear does not have cameras or a way to make sure an attacker is caught, because its focus is sharing the victim's location immediately when there is danger. My product has an app where the person can already share their location at a certain hour when they walk home, instead of when there is already danger. The police and the user can both see the footage recorded on the rings.
Reflection
I would say that I devolved as an artist by expanding my creativity and ingenuity. My final product and inspiration share similar aspects, but the product that I designed I feel is something I would have never thought of unless I was told to design something. Industrial design was an enjoyable unit because I felt like my creativity did not have to stay in a box, and I was unfamiliar with the subject, so I had to think a while about what my product should be and look like because this was something I had no experience with. Because there were no limits to our original ideas, I found myself restricting any ideas I had because they seemed illogical, but it did not matter that much and I let my ideas flow. My inspiration was Invisawear and I would say that it connects very well because both products focus on safety. The biggest challenge about this was explaining and presenting my product, and receiving feedback because everyone had a lot of ideas that I did not know how to narrow down. People also had questions that I did not have answers to, so it was hard to answer their questions. My favorite part about this project was drawing my illustrations digitally, because I feel like drawing digitally is less restricting than traditional drawing. For example there are no color limits, there are perspective tools, and a vast amount of textures and features. My least favorite part was creating the poster in Photopea. The website would run very slowly and take longer to create than expected. The mouse and tools sometimes feel like they can be too sensitive and manipulated easily, and it's hard to fix any mistakes. I hope that the visuals of my poster can show how the product works in a clear way, and I hope that the actual product shows how safety products can develop and increase their potential.
ACT
Clearly explain how you are able to identify the cause effect relationship between your inspiration and its effect on your artwork?
My inspiration was the foundation for my product. It is a safety gadget that serves as an emergency caller. I wanted to create a product that allowed people to feel safe and the subtlety of invisawear was what inspired my work.
What is the overall approach the author has regarding the topic of your inspiration?
Creating a stylish emergency button helps a lot of people and is very useful.
What kind of generalizations and conclusions have you discovered about people, ideas, culture, etc. while you researched your inspiration?
People want to feel safe with products that don't take up too much space, are lightweight, and look pleasing.
What is the central idea or theme around your inspirational research?.
Learning to rely on oneself. Although no one should have to go through a scary and dangerous situation, sometimes it is unavoidable and there are resources that can help.
What kind of inferences did you make while reading your research?
The idea of a safety device or self defense product does not need to be so limited to a singular function.
“This Local Engineer-Entrepreneur’s Pretty Panic Button Is Saving Lives.” UMass Lowell, www.uml.edu/news/news-articles/2019/exhale-invisiwear.aspx.
EforAll. “This Entrepreneur Creates Jewelry to Keep Women Safe - EforAll.” EforAll - Entrepreneurship for All, 20 Jan. 2023, eforall.org/this-entrepreneur-creates-jewelry-to-keep-women-safe.
Photos
“Pepper Spray Images – Browse 8,645 Stock Photos, Vectors, and Video.” Adobe Stock, stock.adobe.com/search?k=pepper+spray&asset_id=43280431.
“Brass Knuckles Images – Browse 8,274 Stock Photos, Vectors, and Video.” Adobe Stock, stock.adobe.com/search?k=brass+knuckles&asset_id=68154223.
Self Defense Keychain Store. “Cat Ears Self Defense Keychain | Self Defense Keychain Store.” Self Defense Keychain Store, selfdefensekeychainstore.com/products/cat-ears-self-defense-keychain.
